Picture

Picture

Tuesday, December 21, 2010

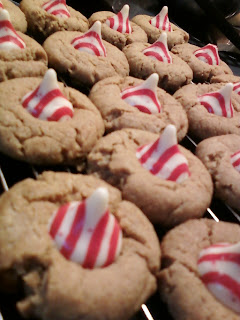
Molasses Krinkles

A fun twist to the molasses krinkle cookie.

Ingredients:

3/4 cup shortening
1 cup brown sugar
1/4 cup molasses
1 whole egg
2 1/4 cups flour
2 teaspoons baking soda
1/8 teaspoon salt
1 teaspoon cinnamon
1 teaspoon ginger
1/2 teaspoon cloves
1/2 cups powdered sugar
1 teaspoon vanilla
1 tablespoon milk
bag of candy cane kisses


Directions:

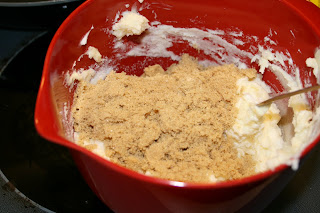
Cream together your shortening and brown sugar. Add the molasses, egg, flour, baking soda, salt and spices - mix.

Roll dough into a ball and press with a floured bottom of a glass.

Bake at 350 for 9-11 minutes. When you remove them from the oven place the candy cane kiss in the center - allow to set and harden. Enjoy!

Wednesday, December 15, 2010

Candy Cane Cookies

When I was a child, my mom made cookies every Christmas just like these. Hers were covered in sugar and were a hard cookie. I had an ingenious idea to attempt these using a soft cookie recipe that I have made in the past, they turned out great. It is a basic white cookie recipe. They are incredibly cute and fun for kids. After making them it dawned on me that laying them in white chocolate and then into crushed candy canes would be even better! But, by this time, Christmas was over and the cookies were already eaten – so, this is my plan for next year’s batch – just to add some more pizazz! :)


Ingredients:

1 package of cream cheese, softened
1 cup of powdered sugar
¾ cup of butter
½ teaspoon vanilla
2 ¼ cups of flour
½ teaspoon of baking soda
½ teaspoon red food colouring


Directions:

Mix cream cheese, sugar, butter and vanilla with a mixer. Add the flour and baking soda – mix.

Separate dough into two equal portions. Add red food colouring to one half. Take a small amount of each dough roll a hand length – roll the two together and form the candy cane.

Place on an ungreased cookie sheet and bake at 325 degrees for 15-20 minutes.

After they cooked I sifted powdered sugar on top.

Tuesday, December 7, 2010

Oreo Cookie Balls

We got this recipe from a friend a few years back and it is definitely a family favourite at Christmas time. Every year at Christmas, MS takes a plate full of treats to work and everyone always comments how great these are!

Ingredients:

Package of Oreo cookies
6 squares of Baker’s white chocolate
1 tablespoon of cooking oil
1 package of cream cheese


Directions:

Crush the Oreo cookies up finely and mix with cream cheese. Roll into balls and place on waxed-paper lined cookie sheet; refrigerate for one hour.

Microwave the baker’s chocolate and the cooking oil.

With a toothpick, dip the balls into the white chocolate mixture – place on a lined waxed paper cookie sheet – I sprinkle the tops with crushed Oreo’s to cover the hole. Then refrigerate to set the chocolate.


Wednesday, December 1, 2010

Norma's Peanut Butter Balls

These are MS’s favourite at Christmas time; and a treat that we both grew up enjoying around the holidays – one of the old standards. Traditional but deliciously addictive!

Ingredients:

6 squares Baker’s chocolate (I use semi-sweet)
1 tablespoon of cooking oil
Chopped peanuts
1 cup of creamy peanut butter
1 cup of icing sugar
1 tablespoon of soft butter or margarine
1 teaspoon of vanilla


Directions:

Mix the peanut butter, icing sugar, butter and vanilla. Shape into balls and place on a waxed-paper lined baking sheet and refrigerate for a couple of hours.

Microwave chocolate and cooking oil; using a toothpick dip the balls in mixture and place on waxed baking sheet to dry. I sprinkle chopped peanuts on top to hide the toothpick hole. Refrigerate until chocolate is set.


Thursday, June 3, 2010

Banana Boat Tortillas

Usually when we go camping our standard snack is, of course, S’MORES! But, this time I was looking for something a little different, so I googled campfire recipes and I came across this delectable treat. I even read reviews where people stated their children liked these better than S’mores – and after trying them, I can see why – although S’mores are still a favourite!

So long as your children like Bananas, Chocolate and Marshmellows – they will love this! The chocolate was my favourite part; and MS loved the banana.


Ingredients:

Bananas
Marshmellows
Large Tortillas
Chocolate bar


Directions:

Place a tortilla flat and add slices of banana, pieces of marshmellow (1 marshmellow into two pieces works well), and squares of your chocolate bar along the center of your tortilla – fold like a fajita so the chocolate doesn’t run out the bottom after it is heated. Place this tightly in a foil packet – heat over your campfire for 5 mins; then unwrap to eat and enjoy! :)


Friday, May 28, 2010

Mojitos

Summer is just around the corner! This is a perfectly drink to refresh you on a beautiful summer’s day! Plus it is cute and fancy enough looking that it will appear to be labour intensive; but it isn’t at all – this is a quick and easy drink to mix!

What you will need:

1 can Minute Maid Limeade
Club soda
White rum
Mint leaves; 6-8 per glass
Sugar


Directions:

First, remove 6-8 mint leaves and bruise with the underside of a spoon; place these in the bottom of your glass;
Then add lots of ice and a shot of rum;
Fill the glass ¾ full of limeade and top it up with ¼ club soda;
Stir in one teaspoon of sugar – mix and Enjoy!


Wednesday, May 26, 2010

Campfire Brie

Tis the season for BBQ and campfires! We took a small trip this past weekend camping and before going I googled many a campfire recipe. We usually make s’mores, but I was looking to try something new. I actually found a handful of new recipes to try - all were really good too - here is one of them! :)


What you will need:

1 wheel of Camembert or Brie
¾ cup of maple syrup
¼ cup walnut or pecan halves
1 loaf of crusty bread – we used Foccacia


Directions:

1. Set the wheel of cheese in the middle of a good size sheet of tinfoil;
2. Poke holes or cut slits in the cheese – so that some of the maple syrup can soak in while it cooks – Pour only ¼ of the syrup onto the cheese along with ½ of your nuts;
3. Wrap it up tightly and place on the coals in your campfire;
4. Cut your bread while you wait;
5. After 5-10 minutes – depending on the heat of your fire; and the size of your cheese wheel – remove the cheese from the fire and add the remaining maple syrup and nuts – dip your bread and enjoy!


So good – and what a fantastic treat while camping!

Printable Chicks Recipe :

Friday, May 21, 2010

Muddy Buddies

If you are looking for that quick chocolate fix; this a great snack! Plus, it is fast and easy!

*I usually halve this recipe; and it makes plenty for the two of us – or a perfect size for when friends come over, but if you are looking to make it and give some to friends/family or take it into work etc. you may want to make the entire batch.*


What you will need:

9 cups of Crispix cereal (American’s can use Chex)
1 cup semisweet chocolate chips
½ cup of peanut butter (I sometimes use Reese’s chips if I have them on hand and they work well)
¼ cup margarine
1 teaspoon vanilla extract
1 ½ cup powdered sugar


Directions:

Measure cereal into a large bowl;
In a separate bowl, add the chocolate chips, peanut butter/or Reese’s chips and margarine. Microwave on high for 1 minute – stir until smooth; then add the vanilla – stir and pour over the cereal.
Stir the mixture until evenly coated with the chocolate mixture.
Then, place half of this mixture on a large piece of parchment paper – sprinkle with powdered sugar until nicely covered; then add remaining chocolate mixture on top of this and sprinkle with powdered sugar again until covered. Let this sit for a few minutes, then mix up the mixture and add more powdered sugar until covered nicely.
Place in an air tight container for storage or a nice serving dish if you can’t wait to eat it! :)


Printable Chicks Recipe :


Friday, May 14, 2010

Twice Baked Potatoes

When I grew up; it seemed like in my family, at least, that suppers usually 9 times out of 10 consisted of meat, potatoes and vegetables. Often times we had frozen mixed vegetables, which to this day I cannot eat…..I didn’t like them as a child and still don’t enjoy them as an adult. But, nowadays, it seems people are getting more and more creative and diverse in their meal preparation. Twice baked potatoes seem to be a popular side dish right now (or even appetizer for some); and they definitely dress up an everyday meal or add a little ‘sparkle’ to a fancier dish.


I found this recipe on the kraft website – it’s a great site for easy meals; and I usually end up loving the finished product. These were no exception. The garlic cooking alone, smelled amazing! They were a bit complex the first time; and don’t seem to be nearly as pretty as some could make them I’m sure, but the flavour was really really good. MS and I are both potatoe lovers….add cheese, bacon and garlic into the mix – Heaven!

PS – I halved this recipe where it was just for the two of us and it turned out perfectly – and I wished that I had done the whole recipe so that we had leftovers!


What you will need:

1 head of garlic
1 tsp. oil
4 large baking potatoes
1 cup of light sour cream
1-1/2 cups shredded cheddar cheese – divided
¼ cup Parmesan cheese
4 slices of bacon, crispy, cooked, drained and crumbled (I just purchased the ‘real’ bacon bits and they worked perfectly)


Directions:

Preheat oven at 400F. Bake your potatoes normally, prick with a fork and place on an oven rack. Cut a thin slice off the top of the garlic head to expose the cloves. Place this on a sheet of foil, drizzle it with oil, wrap loosely and bake for one hour.

Cut the bottoms off of each potatoe – small slice. This will allow them to stand up for presentation purposes. Then when they are cooked you will cut them in the middle to scoop out the excess – centres. Place the potatoe flesh in a medim bowl to mash. Squeeze the garlic to get the cooked portion out – this will be really easy and it will come out right away. Add to the potoatoes. Then add your sour cream and 1 ¼ cup of cheddar and the parmesan cheese. Beat until fluffy, and then spoon this mixture evenly into the shells – mounding – use it all. Place them in a shallow baking dish.

Bake for another 30 minutes and then top them with the remainder cheddar and bacon; and then bake them for another 5 mins until the cheddar is melted and Enjoy!

Printable Chicks Recipe :

Friday, May 7, 2010

How to soften Brown Sugar

Have you ever been all set to bake something really delicious; that you have been craving for the last couple days, and then go to make it – only to find that all of your brown sugar is rock solid? Ugh! – Or at least that’s what I used to say before I found this easy, simple trick that softens brown sugar in seconds!


All you need:

Small dish
Container with brown sugar in it – rock solid
Water
Microwave


Directions:

Place the brown sugar in its container in the microwave with beside it, a small bowl full of water.
Microwave both side by side for about 1 minute; be sure to check it – will crumble in your fingers when softened. The sugar can melt so do not leave it in for too long - the time in the microwave will depend on the quantity of rock solid sugar; if it is still hard after the minute, try another 30 seconds.
You can keep doing this until the sugar is soft.


Beware though – the sugar hardens again quickly (within a couple minutes); so be sure to soften it when you are ready to use it.


Tuesday, May 4, 2010

How to blanche Fiddleheads

On the East; we have a wonderful little treasure that grows once a year in the springtime called Fiddleheads. They are available usually for a few weeks to a month; in May – and you can either pick them yourself on the riverbanks or purchase them at a roadside stand for $3.00 a pound in smaller Towns; and $4.99 a pound in large Cities.

Fiddleheads are a fern; and also known to some as the Fiddlehead Fern. You pick the heads as they just sprout up from their encasing – you don’t want the ones that are grown up tall; or almost a fern. The flavour is said to resemble asparagus, or green beans.


MS and I really enjoy fiddleheads and we usually go up to my parents place and my dad takes us down to his favourite spot to pick them. We usually end up with a full bucket; which for the two of us lasts a year. In order to keep them; you must blanche them first before freezing. If they are blanched and frozen you can keep them for up to 18 months in your freezer. It’s a fun family activity – and rewarding to have gone out and picked your own food!

What you will need:

Strainer
Pot
Large bowl
Ice
Cold Water
Large spoon with holes in it
Salt
Freezer bags
Timer/Watch

To blanche fiddleheads:

1. Firstly, you will need to clean the fiddleheads; this is a difficult task as they have a silky brown casing on them; similar to that in a peanut shell and this can be difficult to wash away. It is best to do this in a stream if possible, and then rewash at home.


2. Once this is done, boil a pot of water – with a dash of salt in it; once the water is boiling place some fiddleheads in the pot of boiling water for 2 minutes. Have a bowl full of very cold water and ice cubes ready in the sink – after the 2 minutes is over, scoop the fiddleheads out of the water and place in cold water. This will stop the cooking process. (You will notice that the fiddleheads have turned a lighter green shade; and your water will be black…do not be alarmed this is normal.) Disgard the water and start the process again.


3. Take the fiddleheads from the cold water and place in a strainer – after a few minutes in the strainer, place handfuls in a freezer bag – portion for the size of your family and then they are ready to freeze.


Fiddleheads are best boiled or steamed - served with vinegar, butter and salt and pepper! Enjoy!

Slider

Related Posts with Thumbnails

Chicks and Whisks   © 2008. Template Recipes by Emporium Digital

TOP